| |
RESULTS
 Our results show that HDR processing and tonemapping can be used to compensate for challenging environments for specimen photography, such as those often encountered when working with large or fragile specimens, as tested here. We did not test extensively in the laboratory with better control of lighting, but even in good photographic conditions, HDR methods should reduce noise, preserve visual information and allow more flexibility in image processing. Our results show that HDR processing and tonemapping can be used to compensate for challenging environments for specimen photography, such as those often encountered when working with large or fragile specimens, as tested here. We did not test extensively in the laboratory with better control of lighting, but even in good photographic conditions, HDR methods should reduce noise, preserve visual information and allow more flexibility in image processing.
Collections ranges
Collections are challenging to the specimen photographer—while they tend to be adequately lit, the lighting is overhead and usually blocked by tall shelving with narrow aisles. Many collections ranges complicate the issue by lacking useful work areas with even lighting or power sources nearby.
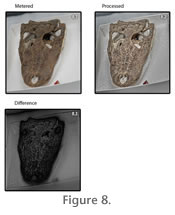
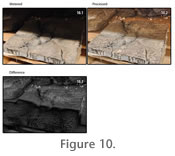
Figure 8 shows the surface texture of a crocodilian skull in considerably more detail in the HDR image (Figure 8.2) than can be seen in the metered exposure (Figure 8.1), demonstrated by the image difference (Figure 8.3). HDR can be used to reduce unneeded contrast, as in cases where specimens are on shelving and may be difficult or impractical to move (Figure 9,
Figure 10), making conventional photography impossible. Extreme contrast adjustments are often unable to recover detail in shadowed areas in a single metered exposure.
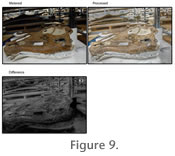 Using HDR the impact of shadows is reduced and anatomic detail can be recovered from specimens that are too delicate or heavy to be moved off of shelving units for photography (Figure 11), while preserving or emphasizing contrast in fine details through the software's local adaptation tonemapping algorithm. Using HDR the impact of shadows is reduced and anatomic detail can be recovered from specimens that are too delicate or heavy to be moved off of shelving units for photography (Figure 11), while preserving or emphasizing contrast in fine details through the software's local adaptation tonemapping algorithm.
In testing, collection ranges proved to be suitable environments for handheld photography, assuming large specimens; all tested ranges featured sufficiently bright light to make fast shutter speeds possible, and simply bracing the elbow supporting the camera on a shelf or leaning against a support pillar provided adequate stabilization to shoot specimens such as hadrosaur skulls. Smaller fossils still required a tripod for successful image acquisition.
 Exhibits Exhibits
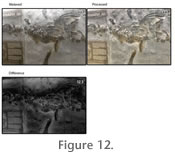
Galleries are often are dramatically lit, creating complex shadows absent in a more evenly lit space. Where specimens are behind glass, HDR can allow image capture that shows more than simply the reflection of the photographer in the glass—while far from perfect,
Figure 12 shows that HDR recovers information about the anatomy behind the glare.
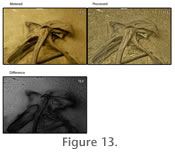
Figure 13 shows both improvement in detail in shadowed areas and in reduced glare from the glass case.
Figure 14 illustrates a worst case scenario: a dark specimen, dramatically lit, and behind glass. Using HDR allowed the omission of flash lighting that would have increased glare from the glass, and evened out the lighting and contrast to highlight additional detail (though, in this case, a polarizing filter aided in glare reduction).
 Even in open mounts the specimens themselves may cast inconvenient shadows.
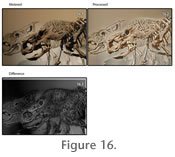
Figure 15, a skeleton on display, shows the improvement in shadows in the HDR version, allowing pelvic structures that are in shadow in the metered exposure to be seen. In particularly well-lit exhibit spaces, detail enhancement tonemapping does not seem to add significant value to the images, although added emphasis may be placed on surface texture, such as in
Figure 16, and overall image noise may be reduced. Even in open mounts the specimens themselves may cast inconvenient shadows.
Figure 15, a skeleton on display, shows the improvement in shadows in the HDR version, allowing pelvic structures that are in shadow in the metered exposure to be seen. In particularly well-lit exhibit spaces, detail enhancement tonemapping does not seem to add significant value to the images, although added emphasis may be placed on surface texture, such as in
Figure 16, and overall image noise may be reduced.
Exhibit spaces were, as seen in Figure 7, not always suitable for handheld use. While many specimens found in the exhibit spaces we tested were large enough that the motion of the camera was insignificant in comparison to the distance to the specimen, in dark environments, the blur caused by camera motion was too great to ignore, even with Hydra's better support for handheld imagery. In well-lit spaces, particularly ones where furniture or other assets exist to brace the camera on, handheld shooting may work.
 Ichnofossils Ichnofossils
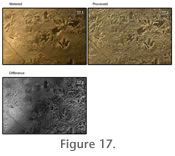
We briefly explored the use of HDR to enhance images of trackways. The Dinosaur State Park trackways (Figure 17) are dramatically lit from low angles to highlight the tracks in the display space. HDR techniques showed that areas that appeared flat in the metered exposure (Figure 17.1) show considerably more surface details (Figure 17.2) in the processed HDR image. The difference image shows there is more detail within the deeper tracks that was hidden in shadow in the metered exposure. The processed image also shows a reduction in large-scale contrast, making fine detail easier to compare.
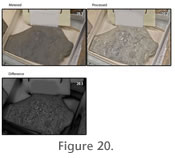
Surface Texture
Bone (Figure 18), plant material (Figure 19) and invertebrate fossils (Figure 20) were all optimized for surface detail. This level of detail was achieved quickly with little user input, in contrast to the larger amount of time needed to produce similar results in Photoshop working from a single LDR image.
 Field photography Field photography
Our tests in field situations were limited, but
Figure 21 shows considerable enhancement of detail in strata as compared with Photoshop manipulations of the metered exposure. We suspect that HDR may prove useful in documenting stratigraphic sections and sedimentary structures, especially the early morning or late afternoon, when the lighting angles cause more extreme contrast, but were unable to test this.
Optical Microscopy
O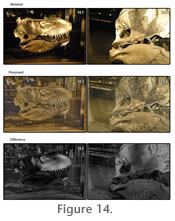 ur tests show that HDR processing is of significant use. Microscopic subjects are frequently poorly lit, and subtle coloration or fine detail may be impossible to effectively emphasize through physical means. Extensive use of HDR-based imaging in microwear studies have shown promise (Fraser, personal commun. 2008). ur tests show that HDR processing is of significant use. Microscopic subjects are frequently poorly lit, and subtle coloration or fine detail may be impossible to effectively emphasize through physical means. Extensive use of HDR-based imaging in microwear studies have shown promise (Fraser, personal commun. 2008).
Microscopic HDR has proven to be extremely susceptible to vibration-related issues, as the low light levels present call for slower shutter speeds. In our tests, we discovered that the vibration caused by a fiber-optic light source's fan on the same work surface caused the specimen under the microscope to move while the shutter was open, causing the images to exhibit motion blurring. More than any other application, microscopic work calls for the camera to use slow automatic shooting speeds, remote operation through software or camera releases, and mirror lock-up (SLR and DSLR cameras use a mirror to provide the viewfinder image, and the swing of the mirror out of the way to expose the sensor causes vibration, which can be prevented by setting the camera to "lock up" the mirror, blocking the viewfinder and leaving the shutter exposed).
 We anticipate that extended depth of field techniques (e. g.
Knappertsbusch et al. 2006) can be combined with HDR processing, but have not tested this. We anticipate that extended depth of field techniques (e. g.
Knappertsbusch et al. 2006) can be combined with HDR processing, but have not tested this.
Comparison of software packages tested
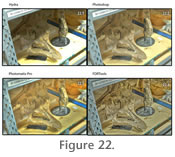
The four software packages used in this paper are not, by any means, the only HDR-capable packages on the market. Many other programs are available, ranging from the simple to the complex. As a complete survey of the market is beyond the scope of this paper, we decided to limit coverage. Photoshop was chosen due to its ubiquity, Photomatix Pro and FDRTools are popular in the online HDR community, and Hydra's ability to process handheld images fit with our goal of analyzing HDR techniques in terms of speed and convenience to the paleontological community.
All of the software tested can generate a usable HDR file, have dynamic range compression and detail enhancement tonemapping algorithms, and can be adjusted to give reasonably similar output.
Figure 22 shows the result of passing the same nine JPEG files through the complete HDR processing pipeline in each application.
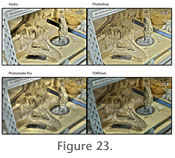
 As there are two distinct stages—assembly and tonemapping—to the processing workflow, we also tonemapped the same HDR file, generated in FDRTools, in all four applications, as seen in
Figure 23. As there are two distinct stages—assembly and tonemapping—to the processing workflow, we also tonemapped the same HDR file, generated in FDRTools, in all four applications, as seen in
Figure 23.
Table 1 summarizes our findings when comparing the software applications tested.
FDRTools places more emphasis on the HDR assembly process than the other three applications. It has three different methods for merging images, and allows the user to include or exclude files or parts of files interactively. As a result, its HDR assembly output seems to preserve slightly more image detail than the others, more cleanly, with an apparently simpler alignment tool. Its detail enhancement algorithm exposes significantly fewer controls than Photomatix Pro's, but generates equivalent or slightly superior output for most uses.
 On our test system, however, it took the longest time to process a given HDR and tonemap. This is mitigated by its interactive preview and batch features, which allow the user to configure multiple sets to process before doing final processing. FDRTools does not include automatic folder crawling; each assembly must be configured by the user prior to start. On our test system, however, it took the longest time to process a given HDR and tonemap. This is mitigated by its interactive preview and batch features, which allow the user to configure multiple sets to process before doing final processing. FDRTools does not include automatic folder crawling; each assembly must be configured by the user prior to start.
Photomatix Pro's interface is conceptually simple, even if at times it overwhelms the user with choices. The HDR assembly process exposes fewer controls than FDRTools, but has an alignment choice and an explicit option for dealing with motion in the image. It does not include per-image weighting, nor the additional assembly methods that FDRTools uses. The tonemapping interface, however, has the most controls of the four, allowing a considerable amount of image processing to be done directly in the tonemapping process. Photomatix Pro was more sensitive to noise than the other applications, and had, as of version 3.0.2, trouble reading some of our RAW images,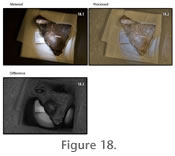 generating distorted or sheared images. Typically, restarting the program solved the problem, but Photomatix Pro handled scenes with noise or grain with less fidelity than the other applications tested. generating distorted or sheared images. Typically, restarting the program solved the problem, but Photomatix Pro handled scenes with noise or grain with less fidelity than the other applications tested.
Photomatix Pro includes a batch processor that will crawl through a folder, processing specified numbers of source images into HDR format and tonemapping them automatically (unlike FDRTools, all sets must be processed with the same settings.) This is made considerably easier by properly organizing the source images in the first place. Photomatix Pro will process filenames in numerical order; however, as our workflow involved shooting a single identifying image of the specimen's label prior to shooting the bracket sequence, we could not simply download the camera to a single folder and unleash Photomatix's batch processor. Having the file preview in order from darkest to lightest made it simpler to locate each set of nine images using the operating system's icon-based prev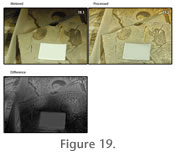 iews than would otherwise be the case. The need to move and rename files manually is less intrusive in the workflow than the equivalent process in FDRTools or Photoshop. iews than would otherwise be the case. The need to move and rename files manually is less intrusive in the workflow than the equivalent process in FDRTools or Photoshop.
Both Photomatix Pro and FDRTools have a preview loupe that allow the user to examine small sections of the HDR image with an automatically updated exposure. This allows the user to see fine detail in small areas without tonemapping, which may be useful.
Photoshop is, of course, the most capable image processor of the four, but its very power means that it requires marginally more user attention than the other applications. Its detail enhancement operator requires, to get equivalent output to the previous two applications, manipulation of a curve rather than a simple numeric setting.
 Its HDR assembly as of Photoshop CS3 Extended is perfectly acceptable, albeit as slow as FDRTools. Photoshop CS4 Extended should be significantly faster on well-equipped computers, as much of the image processing load has been offloaded to the graphics processing unit (GPU). Its HDR assembly as of Photoshop CS3 Extended is perfectly acceptable, albeit as slow as FDRTools. Photoshop CS4 Extended should be significantly faster on well-equipped computers, as much of the image processing load has been offloaded to the graphics processing unit (GPU).
It is important to note at this point that Photomatix Pro tonemapping appears to produce higher-quality results in low-magnification microscopy use than FDRTools at this point, possibly due to it exposing more controls dealing with fine details in the tonemapping stage. Similarly, FDRTools's greater control over the assembly stage permits optimization of the HDR file for this purpose. While further testing is warranted, it appears that microscopic HDR benefits from using FDRTools for assembly and Photomatix Pro for tonemapping.
H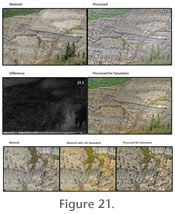 ydra is, unfortunately, still something of a work in progress. Its image alignment tools are, as its advertising indicates, extremely powerful. In our testing, it managed to assemble useful HDRs from handheld brackets that the other applications were unable to handle. However, its interface as a standalone application is badly designed, with no way to save a HDR or tonemapped file with a user-specified filename. Some buttons in the interface do not do anything, and, in general, the program seems to be only half-finished. Stability issues were also present, with crashes happening more frequently than the other three applications combined. It has tight integration with Apple's Aperture software, and in situations where its unique abilities are required, it has no competition among the four we tested. ydra is, unfortunately, still something of a work in progress. Its image alignment tools are, as its advertising indicates, extremely powerful. In our testing, it managed to assemble useful HDRs from handheld brackets that the other applications were unable to handle. However, its interface as a standalone application is badly designed, with no way to save a HDR or tonemapped file with a user-specified filename. Some buttons in the interface do not do anything, and, in general, the program seems to be only half-finished. Stability issues were also present, with crashes happening more frequently than the other three applications combined. It has tight integration with Apple's Aperture software, and in situations where its unique abilities are required, it has no competition among the four we tested.
Hydra aside, the other three applications are all usable as a primary HDR assembly and tonemapping application. Photoshop's ubiquity makes it the likely first HDR application many users will have access to, but we recommend testing the other two applications as well, as Photoshop is the slowest to use from a user interface standpoint (as opposed to its processing speed, which is comparable to the others). Both Photomatix Pro and FDRTools have downloadable demo versions.
 FDRTools will likely remain our default HDR assembly application for the time being, and its resistance to the noise issues that trouble Photomatix Pro means that we will likely use it to tonemap as well. However, Photomatix Pro's greater configurability will keep it in our toolbox. We cannot recommend the current version of Hydra with an entirely clear conscience, but if the ability to shoot handheld is a requirement, then it is worth evaluating Hydra, as updates are frequent. FDRTools will likely remain our default HDR assembly application for the time being, and its resistance to the noise issues that trouble Photomatix Pro means that we will likely use it to tonemap as well. However, Photomatix Pro's greater configurability will keep it in our toolbox. We cannot recommend the current version of Hydra with an entirely clear conscience, but if the ability to shoot handheld is a requirement, then it is worth evaluating Hydra, as updates are frequent.
Problems And Limitations
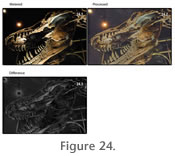
The HDR shooting process, as simple as it can be, does involve several areas that can create additional problems in the final image. The virtual ISO rating of the DSLR should be set as low as possible for the lighting situation. As can be seen in
Figure 24, a high ISO rating, chosen in that figure to reduce the length of time the shutter needed to be open, adds unwanted noise to the image. A complete bracket, one that surrounds the dynamic
 range of the scene completely, can reduce the appearance of noise considerably, but if the ISO rating is too high, even the redundant visual information provided by the bracket may not be able to eliminate noise or grain. range of the scene completely, can reduce the appearance of noise considerably, but if the ISO rating is too high, even the redundant visual information provided by the bracket may not be able to eliminate noise or grain.
Motion complicates effective HDR image acquisition, both in the camera and in the scene. Software, particularly Hydra, can cope with a moving camera; as long as the shutter speed is fast enough that motion blur is imperceptible. Handheld shooting is possible, but in darker areas, or with too low an ISO setting, the shutter may remain open during the higher EV bracketing shots long enough for blur to be recorded. HDR processing cannot restore detail to an image that was not recorded in the first place, and the blurring caused by a moving camera body is frequently best repaired by leaving a particularly blurred image out of the HDR assembly. If the camera moves too much through the bracket, as in
Figure 7, the image may not be recoverable at all. However, if the camera is not adding blur to the scene, software can reduce or eliminate the impact of motion in the background, as long as the subject of the shot is immobile.
 Care must be taken when using detail enhancement operators in tonemapping. The reduction or elimination of shadows can cause an unwanted flattening of the image, as the human eye tends to use shadows as cues to determine shape in photographs. For particular purposes, highlighting of surface detail at the expense of flattened topology may be desired, but this effect can be minimized by the settings used for local operators or the use of global operators for tonemapping. Care must be taken when using detail enhancement operators in tonemapping. The reduction or elimination of shadows can cause an unwanted flattening of the image, as the human eye tends to use shadows as cues to determine shape in photographs. For particular purposes, highlighting of surface detail at the expense of flattened topology may be desired, but this effect can be minimized by the settings used for local operators or the use of global operators for tonemapping.
Colors may be increased in apparent saturation during processing. Even though the resulting colors may, in fact, be mathematically accurate, it may be necessary to reduce the saturation of the resulting image to produce a more "realistic" appearance.
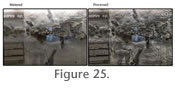 Lastly, we made, during the production of images for this paper, the discovery that autofocus, particularly in areas where one is shooting specimens behind glass, can be problematic. It is often better to manually focus on the object of interest, as the autofocus will often focus on the nearest object, as in
Figure 25, where the autofocus helped us produce a very in-focus reflection on the glass, and a very out-of-focus specimen. Lastly, we made, during the production of images for this paper, the discovery that autofocus, particularly in areas where one is shooting specimens behind glass, can be problematic. It is often better to manually focus on the object of interest, as the autofocus will often focus on the nearest object, as in
Figure 25, where the autofocus helped us produce a very in-focus reflection on the glass, and a very out-of-focus specimen.
|