|
|
|
INTRODUCTION
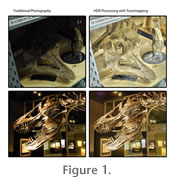
Paleontological photography has traditionally involved a significant investment in time and effort. In many cases, images may be sufficiently difficult to shoot that they are, for all intents and purposes, impossible to acquire. Outside of their own labs, paleontologists rarely have complete control of the lighting when shooting specimens: in collections spaces and exhibit areas, they may have none at all. In the field, not only do they lack control, the available light changes over time. Even if one has portable lights available, the time and space needed to correctly position them may be lacking. The specimens themselves may inherently be difficult to light, as areas of interest to a researcher may be shadowed by other parts of the specimen. Some environments may even prohibit lighting altogether, and the fragility of fossil material can prevent rotating or moving it for photographic purposes.
This paper will present images representing high dynamic range image acquisition and processing under a variety of poorly lit conditions (including exhibits, collections, and outdoors), along with a description of the process involved in preparing these images, and results from commonly available software packages. As the exact workflow varies between packages, this paper will not provide step-by-step directions for using each program. What Is HDR?
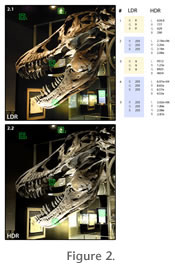
High Dynamic Range images are stored in a format that allows the recording of a wider dynamic range than is typically available in traditional image file formats. Many formats store image data using integer values, and limit how bright and dark particular pixels can be to the output capabilities of monitors or paper. HDR formats store pixel values as floating point numbers, and attempt to record the full range of light values present in the real world, even if the resulting information is too bright or too dark to be seen on a given output device. The most common HDR file format, Radiance, which uses the extension .HDR, stores 32-bit floating point values for each of the R, G, and B channels, as well as a fourth channel containing an exponent value used in combination with the other channels. When compared with file formats such as 16-bit TIFF, this allows Radiance files to store larger, smaller, and more precise values; a pixel shown as black from a TIFF document would contain no additional information, whereas a pixel shown as black from a Radiance document can still contain data about the color of that pixel, even if it is too dark to represent on a given monitor. In practice, .HDR files retain details that cannot be directly displayed on a given output device, but that detail can be exposed through the methods described below.
As an example, two pixels from the center of two different TIFF files may both have color values of 255, 255, 255, or as white as a monitor can display, even if one of the files shows the sun, and the other shows a candle flame. A Radiance file might store the value of the pixel from the candle image as equivalent to 250, 200, 100, but it would also store the pixel from the sun image as 7.0x10⁵, 2.5x10⁶, 2.3x10⁶—thus representing both the true color of the pixel as well as its relative intensity, even if, in the final display of both files, those pixels are shown as white (Figure 2). Unlike traditional image formats, the color values are preserved regardless of how they are displayed, but the pixel that is shown as pure white from the center of the sun could be just as reasonably shown as extremely dim orange, depending on requirements and processing (Bloch 2007).
The necessity to record information that represents real-world light levels, as opposed to values that a given output device can represent, has long been known. Indeed, manual techniques that attempt to solve the same visual problems have been used with film cameras since the 1920s (Eismann 2004;
Wyckoff 1972), although in an extremely time- and labor-intensive way. The initial use of HDR in computer imaging was to store the output of 3D rendering packages, but
Debevec and Malik (1997) detailed a method for generating reality-based HDR values from multiple photographic exposures of the same base scene—the technique described in this paper.
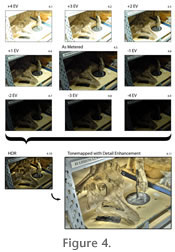
HDR files of real-world situations or environments are created by taking multiple exposures of a single photographic setup, with varying levels of light sensitivity (Figure 4). The photographs are then combined by software, which uses the varying pixel values and the exposure information to deduce how much light was required to cause the camera sensor to react in that particular way across all the images. This information is then saved in a high dynamic range format, which must be processed further for actual use. Why Use HDR?
HDR techniques solve several problems inherent in photography. The initial advantage of the method is that it moves much of the difficulty in choosing camera settings from the photographic session to the editing stage. That is, even if no other benefits of the technique are involved, the ability of an HDR file to store light levels with a more realistic dynamic range allows the photographer to virtually re-expose an image after the fact, instead of having to correctly expose the image at the start. This is not to say that care should not be taken to choose appropriate exposure settings and lighting when photographing, merely to say that the photographer is granted significant additional flexibility when processing (Bloch 2007). More significantly, low dynamic range image formats are poorly designed for image processing purposes. Many image processing algorithms result in fractional values, values that are lost as a result of storing values as integers. Simply allowing the image format to retain information past the decimal point, as in Figure 2, even if the information is not immediately perceptible by the human eye, permits far more accurate image processing, and avoids banding and other errors that occur when images pass through multiple stages of image processing and the inevitable rounding that takes place when values are stored as integers. A brief example can show how this can cause difficulties: if a given grayscale pixel with a value of a hundred has its luminance reduced by a third, it should retain a value of 33.3, but it instead reduces to a plain 33, as do the adjacent pixels with values of 99 and 98. These pixels would change from a smooth three-pixel gradient of values to a solid region of one color. Additional operations can cause further errors of this sort, flattening out smooth gradients and subtle detail into patches of solid color; an overall loss of accuracy unacceptable in professional work.
HDR differs from other techniques that have been discussed for use with fossil specimens, and in some ways may complement them. Unlike many of the image enhancement techniques familiar to paleontologists (various sharpening and edge enhancement filters; Kirschvink et al. 1982; Ekdale and Jeong-Kyungwan 1996), HDR offers the advantage of providing additional detail captured from a specimen, not merely enhancement of the detail already present in a single exposure. HDR imaging is similar in some respects to the methods outlined in Bengtson (2000) for using polarized light to enhance images of Burgess shale specimens and others with similar low-relief preservation. HDR imaging is easy to do in most cases and can be used in conjunction with polarizing filters to produce enhanced images. The combination of multiple exposures into an HDR is similar to Bengtson's use of image interference between two exposures to highlight anatomical details, but is simpler to perform, as HDR techniques have become widespread in software. Reflectance transformation techniques (Hammer et al. 2002) are based on the same principles as HDR, but require considerably more investment in time and equipment than HDR does. Gatesy et al. (2005) tested the use of anaglyph stereo images to improve imaging of trackways and other low-relief impressions. Their methods, developed for work at very high latitudes, require waiting for situations with low even light. The HDR techniques outlined here could also be used to reduce the impact of varying lighting, since HDR images effectively create more even lighting. In addition, HDR images do not require 3D glasses for viewing, although anaglyphic stereo techniques do address one common issue with HDR—that minimizing the impact of shadows will inevitably flatten an image's appearance—and could therefore be profitably used in combination. Creating HDR Images
There are three steps to generate an HDR image: image aquisition, image assembly, and tonemapping. The equipment requirements for using HDR are minimal: a camera capable of incrementally varying the exposure, a mechanism for stabilizing the camera (camera stand, tripod, microscope mount), and a computer with appropriate software. Image acquisition. A minimum of three shots of the same subject at different exposures bracketing +/- 3-4 exposure values (EV, a combination of aperture and shutter speed that provides a measure of the amount of light reaching the sensor) are needed, with all other settings held constant and the camera as stable as possible, with the goal being to vary the amount of light received by the camera's sensor while holding other settings constant. Exposure bracketing should be performed using changes in shutter speed to change the EV, because varying the aperture will alter depth of field between shots, and varying the ISO setting will introduce noise into some of the images. Shutter speed variation can create problems in capturing motion using HDR, but this issue is not significant for specimen photography. More than three shots can be used to create the HDR image, and in general the greater the number used, the smoother the result will be. Using multiple images will also reduce the impact of brackets that are too widely spaced, where a given pixel may lack useful information because it is either under- or over-exposed in the source images. Using multiple images, however, can produce unwanted softness to the result (Bloch 2007), if the camera is not tightly locked down, but will reduce the impact of too widely spaced brackets, where a given pixel may be either under- or over-exposed in the source images, and thus lack useful information for the final image. Better results are obtained by shooting more bracketing shots over a wider range of EVs. The input files can be TIFF, JPEG, or RAW (an unprocessed format recording camera data directly, which must be processed by a RAW interpreter specific to the camera). On the whole, image size does not appear to be an issue, and the user is free to select a convenient size. Images with pixel dimensions of 3872x2592 images were routinely processed for this paper on a 2.5 gHz Mac Pro with 2 GB of RAM.
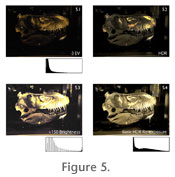
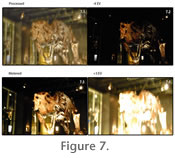
Two issues complicate handheld shooting. Camera motion while the shutter is open will cause blurring of the image, with increasing blur for longer exposure times. Shots taken from different locations will have different viewpoints, making inter-frame alignment challenging or impossible. Of the applications we tested, only Hydra was consistently able to cope adequately with handheld shooting at the ranges used for specimen photography (Figure 5, Figure 6). Even Hydra could not produce a usable file from a handheld bracket shot in a dark room (thus requiring long shutter speeds, Figure 7). The success rate of handheld shooting improves dramatically with brighter lights and greater distances to the subject. If available, a remote trigger should be used, as this will prevent the user from adding vibration to the camera body during shooting.
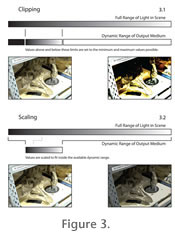
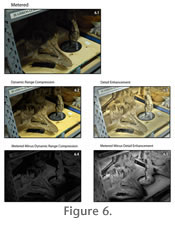
Image Assembly. After acquisition, it is necessary to take the RAW or TIFF files generated and assemble them into HDR files, whether .HDR (Radiance) or .EXR (OpenEXR) files. In general, this process is straightforward, assuming that the camera has included exposure data in the metadata of each generated file. If a specific camera does not automatically indicate at least the relative EV of a given shot to the metered exposure, this value must be entered manually. Depending on the application, other settings having to do with how motion is handled and which images to take information from may be set as well, but overall, this stage can be as simple as passing all shots having to do with a given image to the assembly program. Currently, this stage is somewhat time-intensive, but as technology advances, and more image processing is offloaded onto graphics-specific processors, the time investment for this stage should fall rapidly. Images assembled in this manner also usually have reduced noise, as a single pixel is the result of combining multiple exposures, compared to single images. Tonemapping. HDR files can be thought of as unexposed film; they contain an impressive amount of information that cannot, as yet, be directly seen by the end user. As no monitor or paper can display the full range of dark through light that the file can contain, the files are difficult to deal with in their entirety. The file must be developed, as it were, before it can be used; it must be processed to convert the values that are stored in the file into values that fit with the dynamic range of the output medium, a process that is generally referred to as "Tonemapping." Tonemapping is not restricted to HDR techniques; digital photography inherently requires it, as the electrical impulses generated by a digital camera's sensor, which are stored mostly unprocessed when saved as a RAW file, must be tonemapped to be displayed. (RAW files can, in a sense, be thought of as a form of HDR file, as camera sensors frequently have a greater dynamic range than necessary to generate a print, although this dynamic range is usually less than that of a purpose-composed HDR file.) Any set of rules that govern how a value is turned into something that can be displayed can be considered as tonemapping. Even the most basic process, where values above a certain level are set to white and those below set to black, is a valid tonemapping algorithm. There exist many algorithms for tonemapping (Reinhard et al. 2005), including ones that allow the user to process an HDR file so that the output appears as if it was a photo shot at a given F-stop, even if such a photograph was never taken. Another such algorithm is analogous to Photoshop's "Auto Contrast" command, which will set the brightest value in the image to white, and the darkest to black, with the remainder of values distributed in between (See Figure 4). Other algorithms exist, and some are of particular interest to the paleontologist. These algorithms fall into two main groups that can be called global and local operators. Generally, the global operators apply a given conversion uniformly across the image, while local operators take small sections of the image and process each one differently in order to emphasize particular traits rather than consistency across the image. Local processing is typically used for detail enhancement, intelligently adjusting contrast and brightness to preserve or emphasize fine detail while maintaining overall luminance continuity across the image. In reasonable conditions, local operators allow the reduction or elimination of shadow, the preservation of color and detail in brightly lit areas, and the ability to emphasize fine surface detail too subtle for integer-based file formats to support. Each program discussed in this paper has at least one global and one local operator. In no case do any of these operators add information to the image; they make visual data, which might be difficult to see via a given output device, more apparent. Figure 6 shows the difference between a global operator's output (Photomatix Pro's Tone Compressor, an implementation of the aforementioned equivalent of Auto Contrast), and a local detail enhancement operator (FDRTools's Compressor). The applications discussed below each have roughly comparable functions, but the exact details of each program's operation vary, making direct comparison between particular functions difficult. Once a given image has been tonemapped, it may be treated as a normal, low-dynamic-range image. |
|