

 Quicktime VR: A powerful new illustrative tool for micropaleontological research
Article number: 1.2.9A
Copyright Paleontological Society, 1 August 1998
https://doi.org/10.26879/98009
Plain-language and multi-lingual abstracts
PDF version
Submission: 10 June, 1998 Acceptance: 9 July 1998
PE NOTE: In order to view the QuickTime VR movie, QuickTime 3.0 or higher is required. It is available for both Macintosh and PC. QuickTime can be downloaded free from www.apple.com/quicktime/. QuickTime and the QuickTime logo are trademarks used under license. QuickTime is registered in the U.S. and other countries.
ABSTRACT
Publication in electronic journals permits authors to substantially increase the number and type of methods used to illustrate important concepts. An example of one of these new techniques of illustration, only available electronically, is QuickTime VR movies.
Although too time consuming for routine micropaleontological illustration (about 6 hours per illustration), QuickTime VR object movies hold great promise for illustrating new species as these movies permit the viewer to rotate and view a virtual copy of the specimen from any angle. A specimen of the benthic forminifer Elphidium crispum (well documented and illustrated in scientific literature) was used to produce a series of digitally captured scanning electron images. The images were edited and assembled using Apple’s QuickTime VR Authoring Studio program.
The process of assembling a QuickTime VR object movie is relatively simple and straightforward once the images are suitably prepared. Postproduction time can be significantly reduced if care is taken to mount the sample exactly in the center of the stub.
Patrick D. Lyons, Department of Earth Sciences, Carleton University, Ottawa, Ontario K1S 5B6, Canada, plyons@chat.carleton.ca
Laurence Head, 2 BlackDogs, 236 Greensway Avenue, Vanier, Ontario K1L 7V4, Canada, plyons@chat.carleton.ca
KEY WORDS: QuickTime VR, illustration, micropaleontology, electronic, electronic media
Final citation: Lyons, Patrick D. and Head, Laurence. 1998. Quicktime VR: A powerful new illustrative toolfor micropaleontological research, Palaeontologia Electronica Vol. 1, Issue 2; 9A; 12p. https://doi.org/10.26879/98009
palaeo-electronica.org/content/1998-2/769-quicktime-vr
INTRODUCTION
The type and number of illustrations that the author can use to demonstrate ideas are limited in traditional scientific journals. In these journals, color printing remains prohibitively expensive and even high quality black and white plates are expensive to produce. However with the advent of electronic journals, currently more than 5000 (NewJour, 1997), these limitations are no longer a factor. Authors have a host of other means to express and convey their ideas: color illustrations, audio, animation and movies all can be used to great effect.
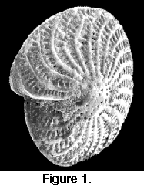 In this paper we present an exciting example of the potential of the electronic medium in paleontological illustration. We used Apple's QuickTime VR technology and a scanning electron microscope (SEM), to produce a series of images of the benthic foraminiferan Elphidium crispum Linné, 1758. These images were then combined to form a QuickTime VR object movie (Figure 1). This type of QuickTime movie allows the viewer to manipulate the object, and depending on the complexity of the movie, view it from all angles (Heid 1997). The benefit of QuickTime VR is that with proper preparation the final movie is relatively easy to generate, and instead of just a series of static images the viewer has the ability to examine a virtual copy of the specimen. We are not aware of any previous combined application of QuickTime VR and SEM in the scientific literature.
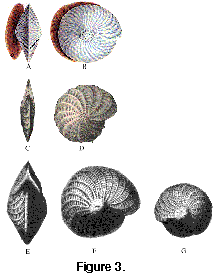
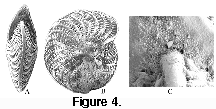
As a companion and comparison to the QuickTime VR object movie a brief illustrative history of Elphidium crispum is presented. Due to its common occurrence, relatively large size (300µm) and ornate structure, Elphidium crispum has been illustrated repeatedly in the scientific literature during the past 300 years. 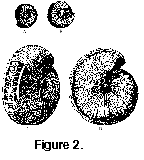 The first illustrations were drawings done in the early to middle 18th century (Plancus 1739, Figure 2 A, B and Gualterius 1742, C, D). Generally the poor quality of microscope optics and light sources available made accurate representation of the species difficult. By the late 18th century the advent of more advanced microscopy, including the introduction of the camera lucida, permitted much better technical illustrations to be produced (Fichtel and Moll 1798, Figure 3 A, B; Williamson 1858, Figure 3 C, D; and Brady 1884, Figure 3 E, F in Barker 1960). The epitome of static illustration was achieved when K. C. A. Smith of the Cambridge University Engineering Laboratory in England constructed a SEM for the Pulp and Paper Research Institute of Canada in 1960. This SEM was the first that was capable of producing images of present day quality (Wells, 1974). This equipment permitted excellent quality images, often at high resolution and resulted in an explosive increase in micropaleontological research (Figure 4 A-4C ). The advent of QuickTime VR technology, coupled with SEM images, has the potential to revolutionize micropaleontological illustration again.
METHODS
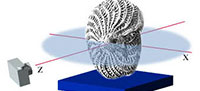
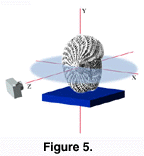
 The benthic forminifer Elphidium crispum was chosen for this example because of its well-defined ornamentation and symmetric appearance. The sample was mounted so that the long axis (X-Y plane) of the specimen was vertical. It is of critical importance that the specimen be positioned exactly in the center of the stub; otherwise the center of rotation will not be that of the specimen. The exact center of the stub can be determined by scoring the surface with bisecting lines. The JEOL 6400 SEM used was equipped with a universal stage, which allowed a great degree of freedom in positioning the specimen and permitted the sample to be captured from a multitude of angles. The images were captured digitally, although prints also were made to allow for easy reference during the movie assembly. The initial images were taken in the X-Z plane (Figure 5) and at constant magnification. The stage was rotated through 360° and images were captured every 18° for a total of twenty images. Brightness and contrast were adjusted throughout the sequence in an attempt to remain consistent throughout the series.
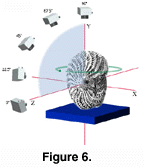
 In order to create a QuickTime VR object that allows the viewer completely to view the sample from any position, it is necessary to capture the sample from all three planes: X-Y, X-Z and Y-Z (not done for the present sample). Instead of just capturing the sample through 360° of rotation in the X-Z plane, the sample is orientated to the electron gun in another plane (i.e. Y-Z plane). At each angular increment in the Y-Z plane the sample is completely captured through 360° in the X-Z plane. It is important to keep the same angular increments in the X-Z plane as used previously (i.e. if images initially were taken at 18° intervals, the same interval must be kept). The same applies to the angular increments in the Y-Z plane (Figure 6). In other words, if in the first series, the sample was angled 10° (in the Y-Z plane), the second series must be additionally angled by another 10°. This means that in order to reach the ‘top’ of the sample, nine series (of 360° rotation) must be taken for a total of 90° in Y-Z plane. The sample is then flipped, with care taken to center the sample on the SEM stub. The same starting position in the X-Y plane is used and the process is repeated to capture the Y-Z plane. Although this level of illustration would result in a seamless QuickTime VR object movie viewable from any perspective, this is not required for all but the most demanding applications.
 Once the images were captured they were imported to Photoshop 4.0 to be digitally edited. Backgrounds were removed and both brightness and contrast were corrected. They were then exported as PICT files into Apple’s QuickTime VR Authoring Studio software package. From within this package, all the various attributes of the final movie can be configured; i.e. starting frame, the number of frames per second, the height and width of the movie, type and amount of video compression. It is also from within this package that hot spots are created. A hot spot is an area that allows further interaction with the QuickTime movie. In this case, when the viewer clicks on the hot spot, magnified images of the aperture can be viewed. We used the polygon tool in QuickTime VR Authoring Studio software package to draw the hot spots. This process must be repeated for each frame that is to contain hot spots.
The equipment used to produce the QuickTime VR object movie was an Apple Macintosh G3 with 160 megabytes of memory. The software packages used were Adobe Photoshop 4.0, Graphic Converter 3.2 and Apple’s QuickTime VR Authoring Studio.
RESULTS AND DISCUSSION
The original aim of this project was to develop and demonstrate a QuickTime VR object movie that permitted the user to manipulate and view the specimen from any angle. However, as can be seen from the example, this is not the case; the specimen can only be viewed from one perspective. Over a period of a day and half, a total of 181 images were taken of Elphidium crispum, most of which were not used in the final product. As this was an experiment, much time and effort was expended to determine the proper procedure. Although we include a description of all our mishaps below, this is not meant to dissuade future creators of QuickTime VR movies for the purpose of micropaleontological illustration. Following the correct procedure, an adequate QuickTime VR movie could be assembled from as few as 20 images.
 For the initial run it was decided images were to be captured every 10° in the X-Y plane for a total of 36 images and coverage in the Y-Z plane would be every 22.5°. The first series of images had to be aborted midway through when it was discovered that the increments used to turn the stage were too small. We determined that the control used to rotate the stage did not, as initially thought, measure degrees but instead used a relative measure in the form of a counter that was numbered from 1-100. This problem made it very difficult to adjust the counter for 10° increments of rotation. It was decided that the increments of rotation would be increased to a number that was easily divisible into 100. Images would be captured at intervals of 18°, thus requiring a total of 20 images to encircle the sample. Several series of images were captured at 22.5° increments above and below the equator (chosen to be the intersection of the X-Z plane with that of the two other planes) of the specimen. We also decided to incorporate a second QuickTime movie illustrating the aperture of the specimen through increasing stages of magnification (the hotspot).
After all the images were captured, they were burned onto CD-ROM for transport and further work. The images were imported into Adobe Photoshop 4.0 to be touched up and corrected. The backgrounds were removed and replaced with uniform black and using Apple’s QuickTime VR Authoring Studio software package a rough QuickTime VR object movie was assembled. At this point we determined that there were significant problems with the individual series of images obtained.
Each sequence on its own could be assembled into an object movie, but they could not be incorporated into a single movie. This was primarily due to the change in rotational increments from 10° to 18° (in X-Y plane). The most time consuming problem that had to be overcome was the wobble generated by the off-center mounting of the sample. This difficulty was eventually overcome by determining the point of rotation of each frame and then manually aligning each image as a layer in Photoshop. A total of 50 hours was spent correcting the images, with the majority spent centering the images. This time would have been unnecessary if the specimen had initially been mounted exactly in the center of the SEM stub.
Once the images were corrected, they were imported into Apple’s QuickTime VR Authoring Studio software package. This application allows for very quick and easy creation of both QuickTime panoramas and object movies. The basic QuickTime VR object movie was completed and a hotspot was created to link the second linear object movie (the zoomed aperture movie). Both the hotspot and the linear aperture object movie were very easy to create. The time devoted to assembling the final movie was about one hour.
The majority of the problems encountered during the experiment would have been avoided if we had taken more care in centering the specimen on the SEM stub. This would have reduced the time spent correcting the various images in Photoshop from 50 hours to less than 3 hours. From start to finish a complete QuickTime VR object movie could be completed in about 6 hours (including time spent capturing the images on the SEM).
RECOMMENDED PROCEDURE
- Mount the specimen dead center on the SEM stub.
- Adjust the brightness and contrast to clearly differentiate the specimen from the background. This will permit easier adjustment of the final images when they are exported into Adobe Photoshop.
- Capture the specimen through 360° of rotation using 15° or 18° increments (for a total of either 20 or 25 images), with the electron gun perpendicular or slightly angled above the equator of the specimen. Smaller angular increments could be used for a smoother object movie, however since smaller angular increments result in more images, more time would be required to prepare the final movie. More images also result in larger file sizes.
- Import the images into Photoshop, and remove the background, either using the magic wand tool or by manually selecting and deleting the background.
- Export the images as PICT files.
- Run Apple’s QuickTime VR Studio application and create a new object.
- Define the object by inputting the number of images and the degree increments.
- Import the images into QuickTime VR Authoring Studio.
- Adjust compression, object and playback through ‘Settings’.
- Create the object.
CONCLUSIONS
- Use of QuickTime VR to illustrate both micro and macrofossils is a viable method in the electronic medium.
- QuickTime VR objects allow the viewer a more complete understanding of the micropaleontological specimen.
- Significant planning and preparation must be undertaken before imaging a specimen in order to prevent wasting significant time in postproduction.
- The construction of a QuickTime VR object movie from suitably prepared images is straight forward and fast.
- Although too consuming for routine micropaleontological imaging, use of QuickTime VR holds great promise for illustrating type material in the description of new taxa. We therefore hope that the International Commission on Zoological Nomenclature will soon recognize the use of electronic media as a valid method of describing new taxa.
ACKNOWLEDGMENTS
This project was funded by NSERC Grant OGP0041665 to R.T. Patterson, and with equipment supplied by Apple Computer Canada through the Apple Education Consultant Program (AECP). We also thank the multimedia production company 2Black Dogs, and the Teaching Learning Resource Center of Carleton University for technical support. We especially appreciate the patience of the technicians of the Carleton University Research Facility for Electron Microscopy (CURFEM). We acknowledge the help of B. Boudreau for help in capturing images. We thank J. Peressini, K. Lyons, and N. Mezzetta for suggestions in clarifying and improving the manuscript.
REFERENCES
BARKER, R. W., 1960, Taxonomic notes on the species figured by H. B. Brady in his Report on the Foraminifera dredged by H.M.S. Challenger during the years 1873-1876: Society of Economic Paleontologists and Mineralogists Special Publication No. 9, 238 p.
HEID, J., 1997, QuickTime VR Clinic, Part 2: Objects. Macworld February 1997: 196-198.
LINNÉ, C., 1758, Systema naturae per regna tria naturae, secundum classes, ordines, genera, species, cim characteribus, differentiis, synonymis, locis: G. Engelmann, Lipsiae, ed., v. 1, p. 1-824.
RÖGL, F., and HANSEN, H.J., 1984, Foraminifera described by Fichtel and Moll in 1798, a revision of Testacea Microscopica. Verlag Ferdinand Berger and Söhne, Wien, 143 p.
WELLS, O.C., 1974, Scanning Electron Microscopy. McGraw-Hill Book Company, Montréal p.17.
WILLIAMSON, W.C., 1858, On the recent foraminifera of Great Britain. Ray Society, London, England, p. 1- 107.
SYNONYMY
Elphidium crispum (Linné, 1758)
1758 Elphidium crispus Linné, p.709.
1742 Indextestarum conchyliorum Gualterius, p.7-23, pls 1-110. [Invalid by ICZN].
1739 De conchis minus notis liber cui accessit specimen aestus reciproci maris superi ad. littus portamque arimini. venetia Plancus, p. 1-88, pls 1-5. [Invalid by ICZN].
